Header Area
Set Your Navigation Position
First thing you have to know is Applique has the possibility to create 2 different header types for your page or post, you can choose the style that suits you the most. Header area is appear at the top bar includes navigation menu and your logo. Applique’s default navigation menu is above the logo. In order to set your Navigation Menu, go to WordPress Dashboard > Appearance > Customize > Header > Navigations.
After, be sure to hit “Save & Publish” button.
Insert Your Logo
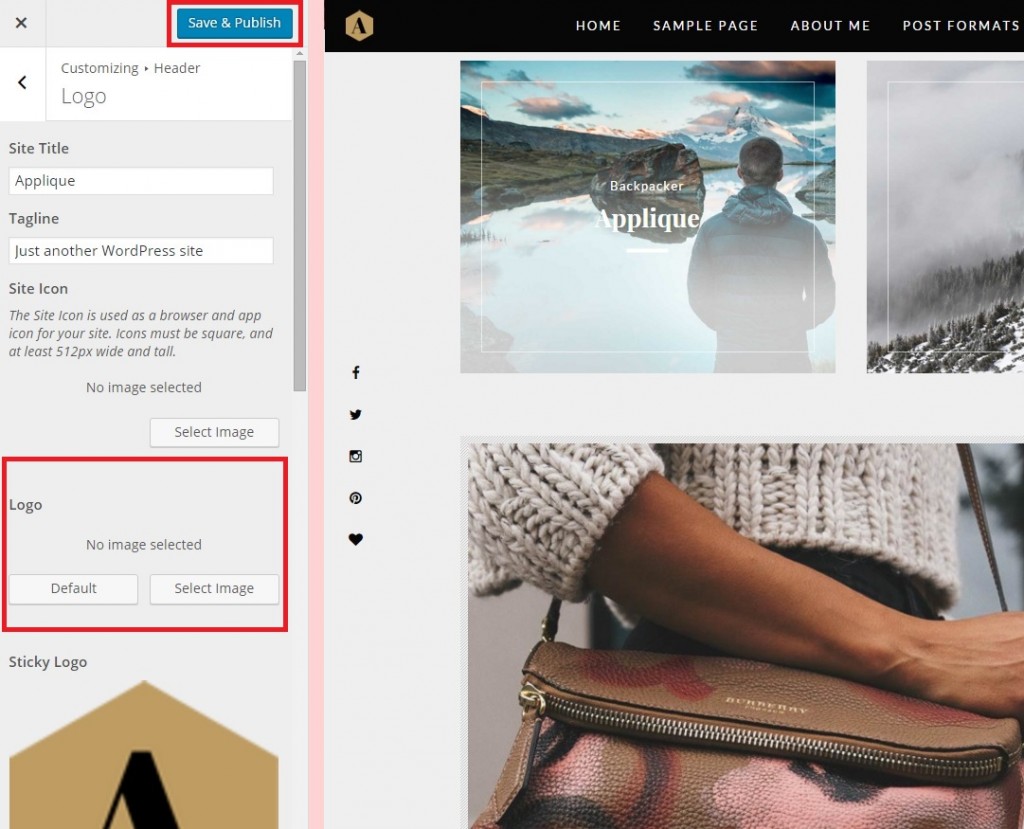
To upload your logo navigate to WordPress Dashboard > Appearance > Customize > Header > Logo. There are list options, choose titled “Logo” simply click “Select Image”and browse your logo. Before you saved it, on the right you can see the live preview how’s your logo will display. Once you’ve saved it your logo will be display. You can also set your site icon image within upload your image in a list option named “Site Icon”
Note: Applique’s logo image default is set at 345px 120px, within a container that is 1170px wide.
How to Set Your Sticky Logo
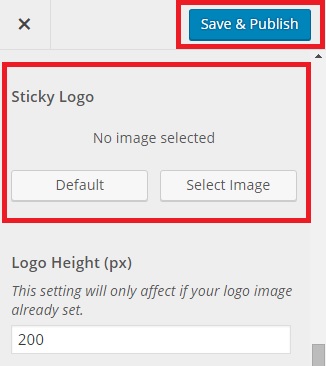
Sticky logo will appear when you scrolling down your site, it’s on a line with your navigation menu. To upload your sticky logo go to WordPress Dashboard > Appearance > Customize > Header > Sticky logo > click ‘Select Image’ button, and then browse your sticky logo image.
How to Set Your Header Parallax & Logo Background Image
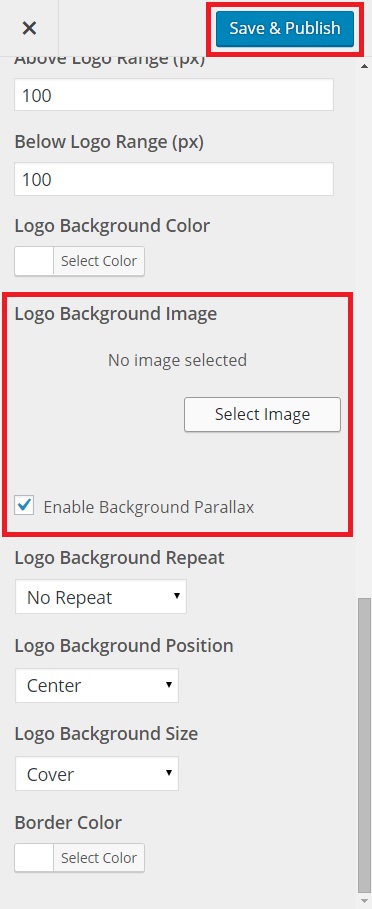
Go to WordPress Dashboard > Appearance > Customize > Header > Logo > scroll down and find the ‘Logo Background Image’ option > Select Image, and then browse your desired image. After, don’t forget to check the box next to ‘Enable Background Parallax’. On the right of your screen, you can see the live preview before you hit the ‘Save & Publish’ button.
Creating a Main Menu
There are 2 ways to setting up Applique’s main menu (navigation menu) in the top bar. First way, navigate to:
- WordPress Dashboard > Appearance > Menus
- “Create a new menu” > “Menu Name” > create your menu name > click Create Menu

- Be sure to assign the menu to a “Theme Location” by checking the tick box and click “Save Menu”.

Adding Pages, Categories, etc. to your Menu
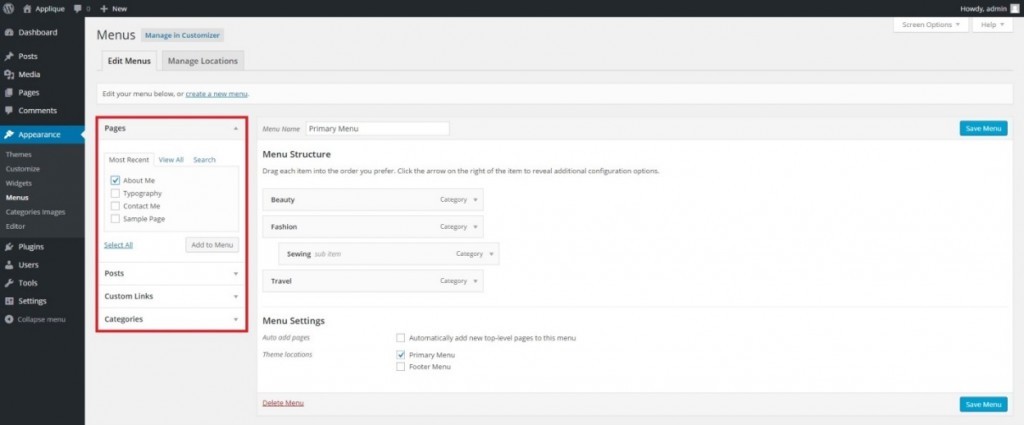
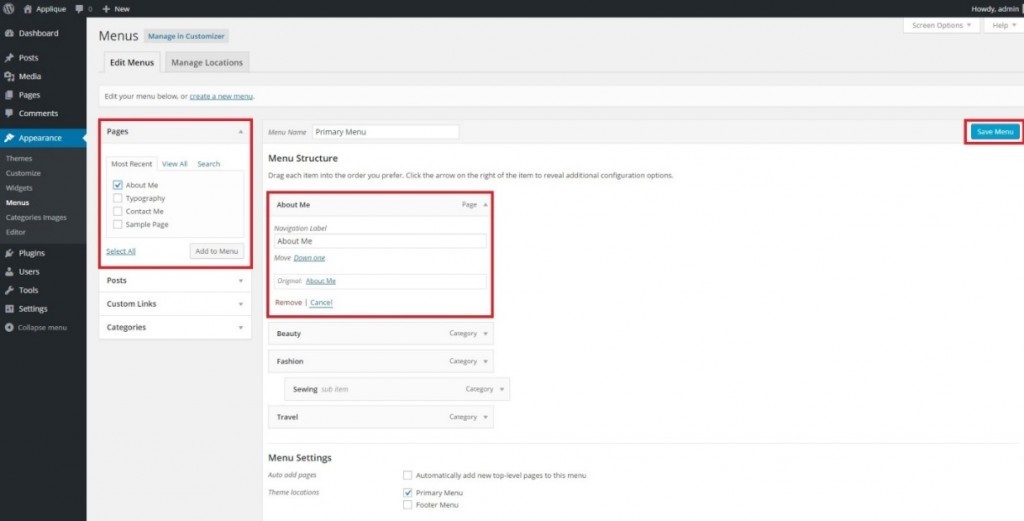
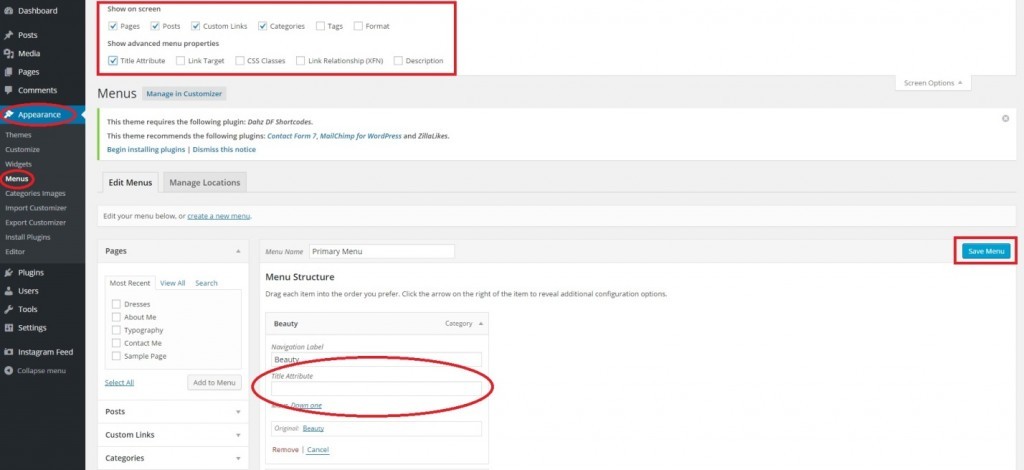
On the left side of this screen are a number of drop-down boxes titled “Pages”, “Posts”, “Custom Links” and “Categories”. Each heading will list available items you can add to your menu.
For example, to add a Page to your menu, please ensure you’ve first created the desired page (within WorPress Dashboard > Pages > Add New). Click the “Pages” drop-down heading. The pages you’ve created will be listed below (see screenshot below). Check the box next to the page you’d like to add to your menu and click “Add to menu“.
The selected item should now appear under “Menu Structure” column. Here, you can drag and drop the item you’ve added to adjust its location in the menu. You can also create sub-menus by dragging and dropping a menu item underneath another so that it’s indented. Be sure to click “Save Menu” button.
Adding a “Post” to Your Menu
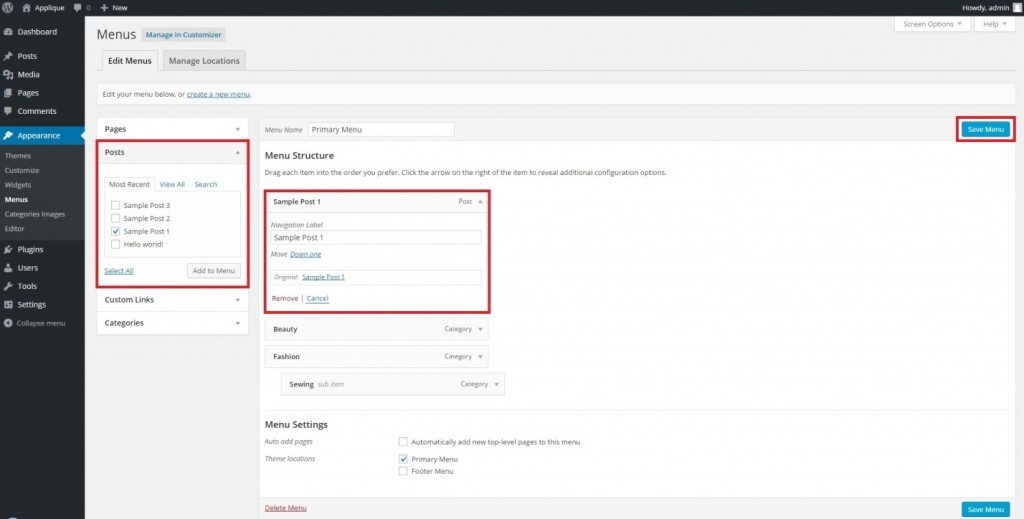
For example, to add a Post to your menu, please ensure you’ve first created the desired post (within WordPress Dashboard > Post > Add New). Click the “Post” drop-down heading. The post you’ve created will be listed under drop-down heading. Check the box next to the post you’d like to add to your menu and click “Add to menu“.
The selected item should now appear under “Menu Structure” column. Here, you can drag and drop the item you’ve added to adjust its location in the menu. You can also create sub-menus by dragging and dropping a menu item underneath another so that it’s indented. Be sure to click “Save Menu” button.
Adding a “Home” Link to Your Menu
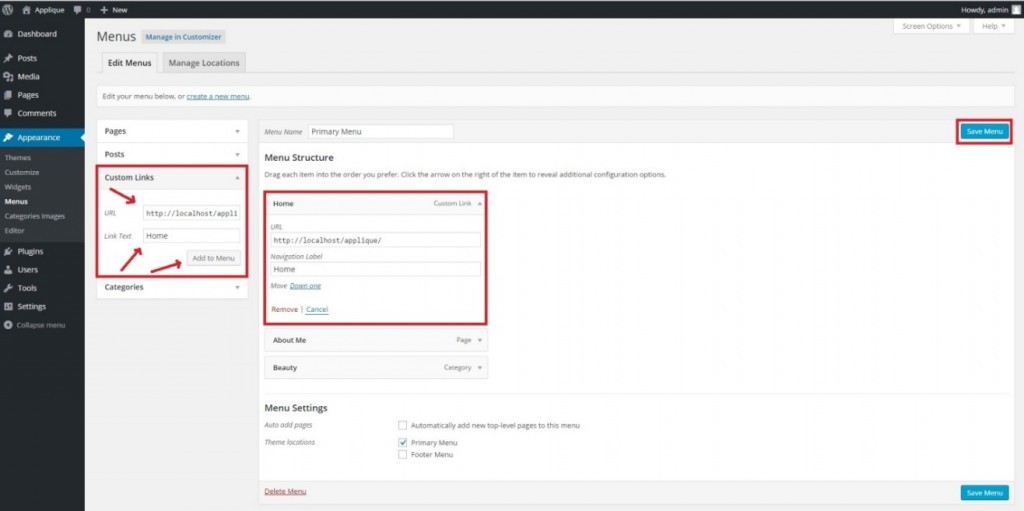
Add a link to your navigation menu that will direct users back to your homepage, select the “Link” drop-down menu. Enter your homepage’s URL into the appropriate box and give it a title, such as “Home” and click “Add to Menu”. Then, you will see your “Home” link at the below of “Menu Structure”. Be sure to hit the “Save Menu” button.
Adding a Category Page to Your Menu
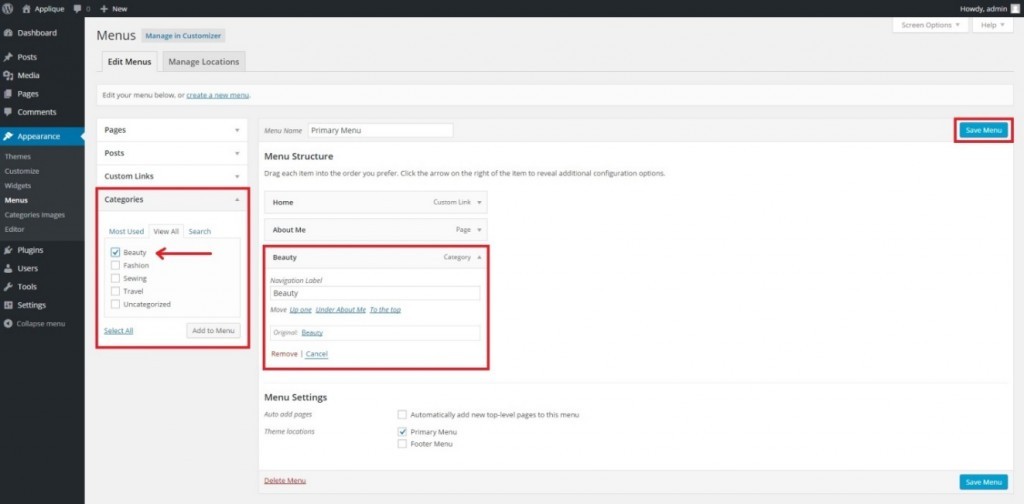
Once you’ve created a post category (within a post’s create/edit screen) and assigned it to at least one post. Navigate to Appearance > Menus > Categories, you will see this category listed. Check the box next to your desired category and select “Add to Menu”. WordPress will automatically generate a page and pull in all posts that have this particular category assigned to it. Be sure to click “Save Menu” button.
Sub Menus
You can create sub-menus by dragging and dropping the items within other menu items.
Editing Menu Items
If you want to edit or remove a menu item, click the little arrow on the right-side of the menu item name. A selection of options will drop down, including editing the navigation label as well as removing the item altogether.
Additional Menu Item Features
For additional menu features, click on the “Screen Options” tab in the top-right corner of the Menu page. Here, you can add the option of linking directly to a Post or specific Tag within your navigation menu. You can also check the box next to “Link Target” to give yourself the option of having menu items open in an entirely new tab when clicked.
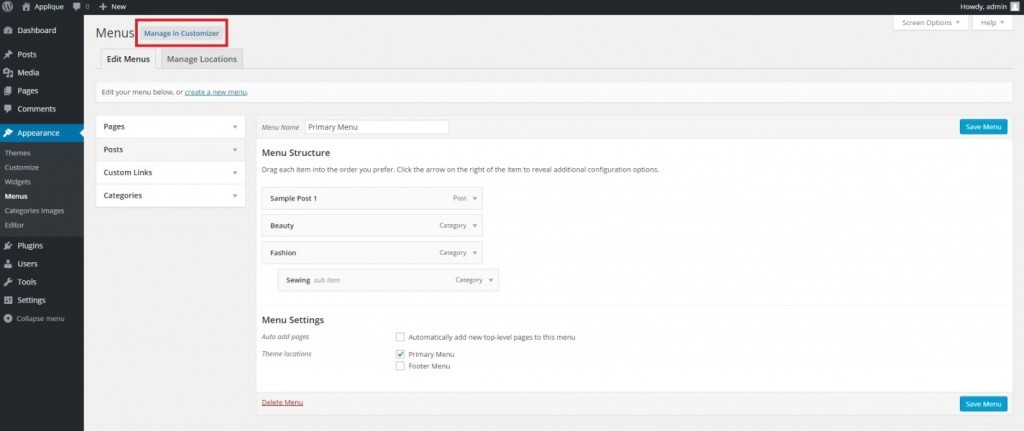
Second, you can also edit and add the menus on Customizer. After you set the menus that you’ve created above, then click the “Manage in Customizer” button at the top next to “Menus” (within WordPress Dashboard > Appearance > Menus).
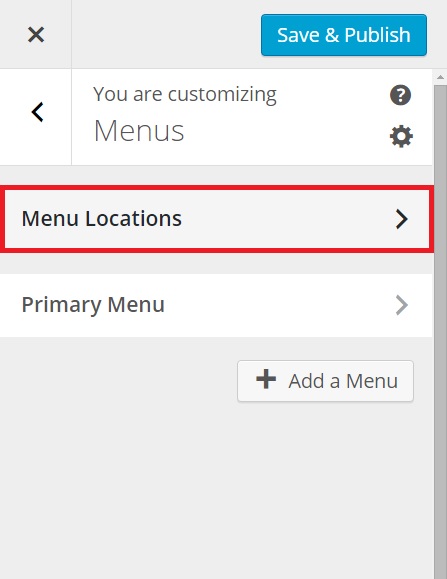
Or you can navigate to WordPress Dashboard > Appearance > Customize > Menus.
On the left of this screen, click the option titled “Menu Locations”.
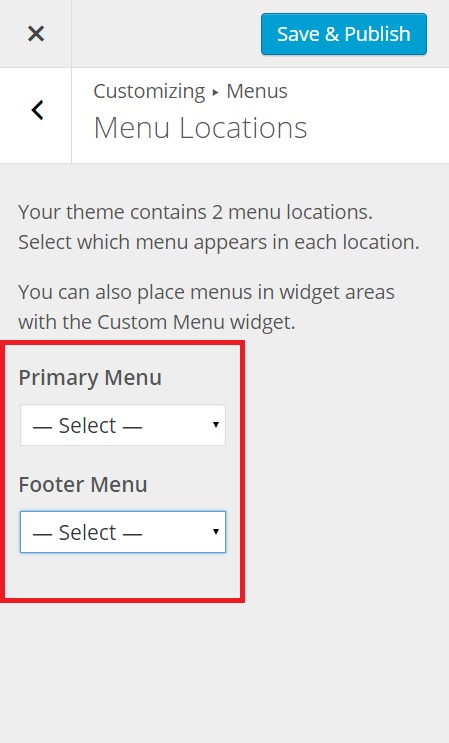
Select your menu location whether Primary or Footer Menus by clicking drop-down menu in each option. You can see the live preview on the right of your screen first before hit the “Save & Publish” button.
For more information on menus in WordPress, check out:


