Using Applique
Body Area
Creating a Post
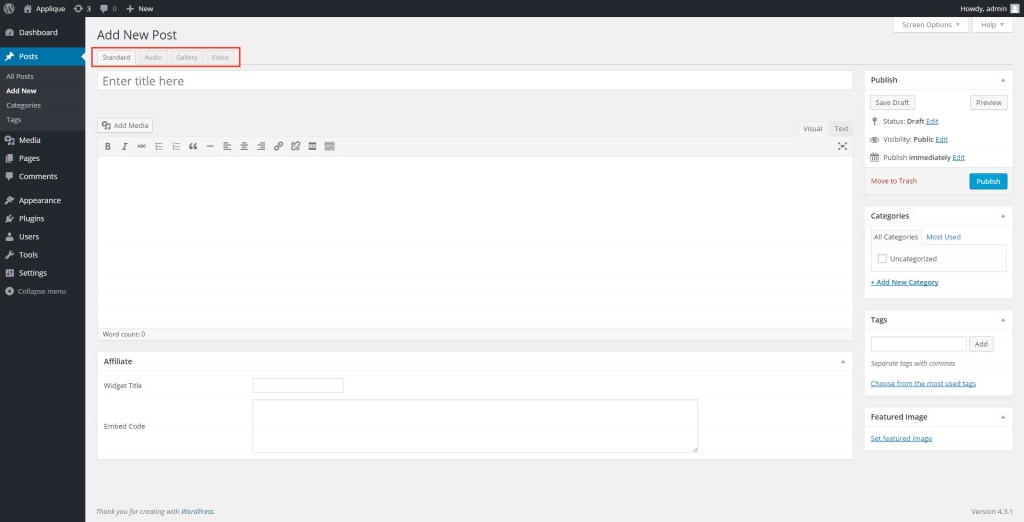
First thing you have to know that Applique is already integrated with Vafpress Post Format UI plugin, and has 4 possibilities of different types of posts: standard, audio, video, and gallery.
To create a post go to WordPress Dashboard > Posts > Add New.
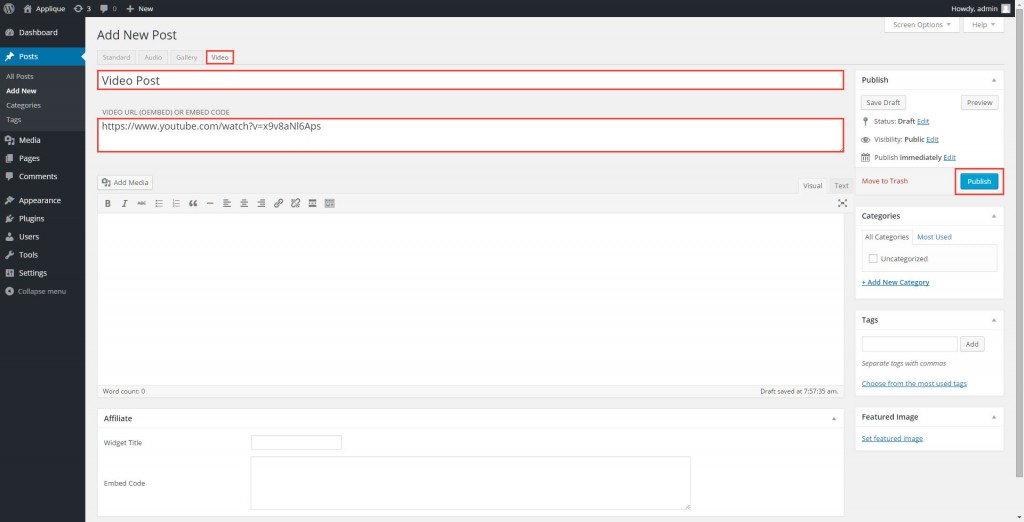
Above of your content box & toolbar, you’ll see a series of tabs titled Standard, Audio, Gallery, and Video. Select whichever tab you’d like your post format to be in. Each tab will give you different input boxes depending on the content you’d like to add.
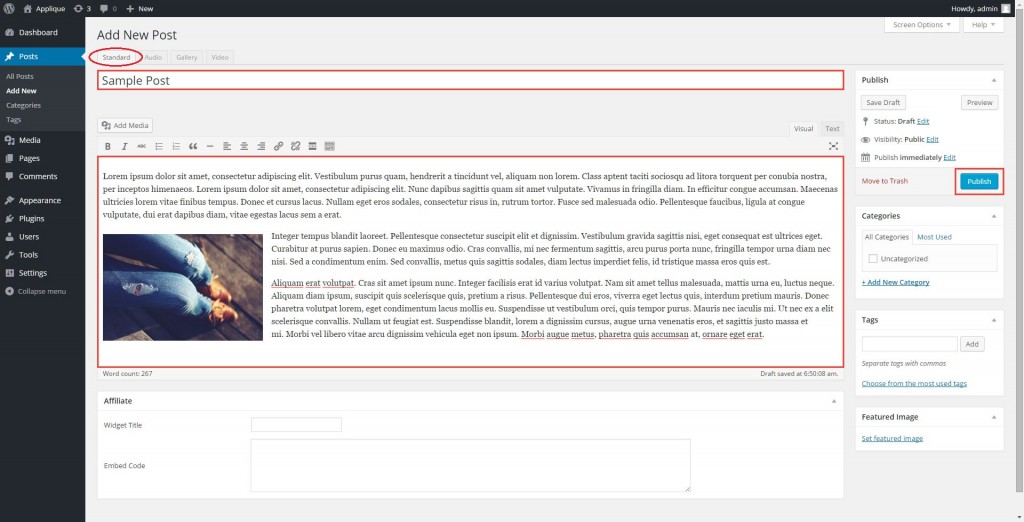
Standard Post
A standard post is the default post type. You can add text and images to your post using the tools and content box. After you write your content, don’t forget to click “Publish” button.
Example of a standard post: http://dahz.daffyhazan.com/applique/fashion/the-simplest-way-to-look-chic/
Gallery Post
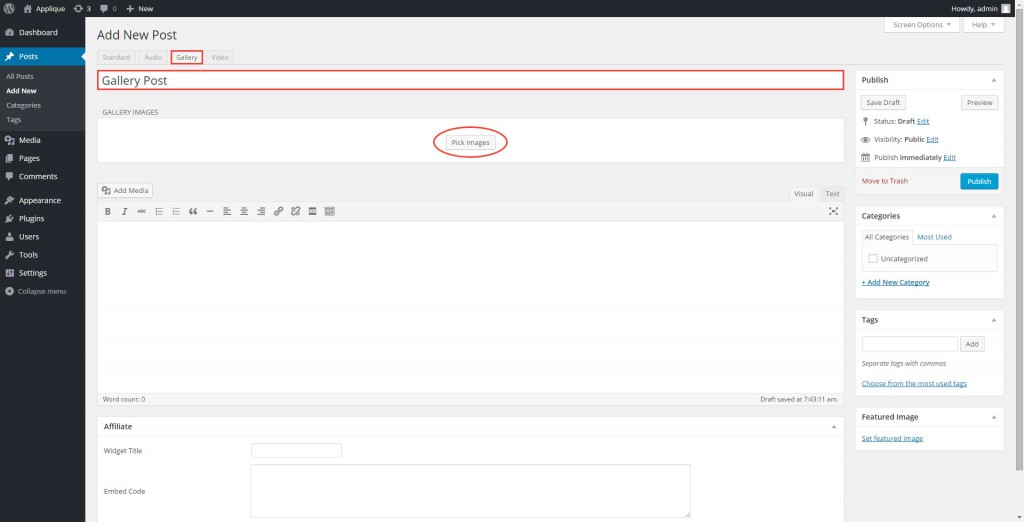
A gallery post allows you to create a slideshow-type gallery at the top of your post. After clicking the “Gallery” tab to choose this post format option, click the “Pick Images” button within the “Gallery Images” box that appeared. Select whatever images you’d like from your WordPress Media Library.
Example of gallery post: http://dahz.daffyhazan.com/applique/fashion/because-real-style-lasts-forever/
After that, select “Upload Files” then browse whatever image you’d like from your Computer by click “Select Files”. Click “Add Image(s)”, then your photo(s) will automatically in “Media Library”. So you can collect your image first before publish. Simply click on your desired photo, and then click “Add Image(s)”. Be sure to click “Publish” button.
Audio Post
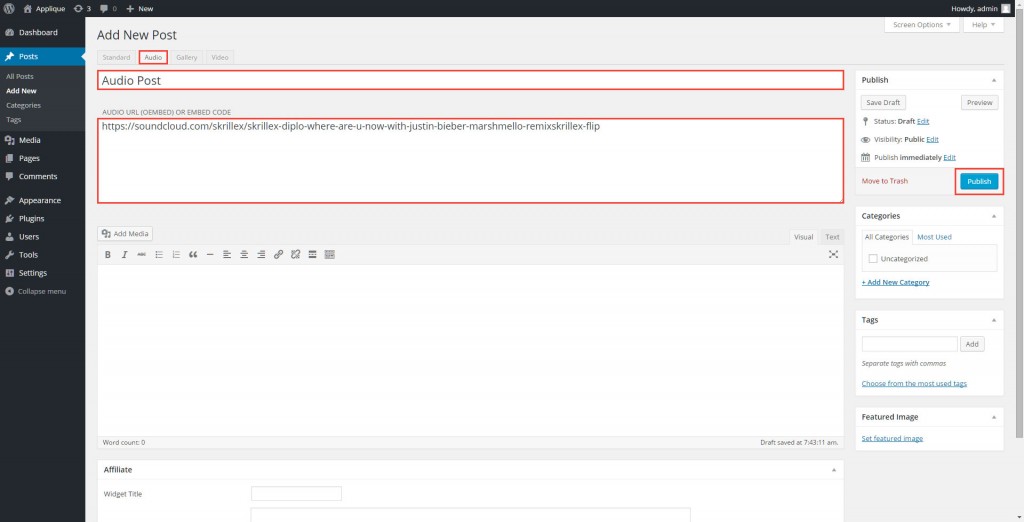
An audio post allows you to share a music or audio track and displays it at the top of the post. Simply copy & paste the track’s URL, or embed code into the special audio input box.
Example of an audio post: http://dahz.daffyhazan.com/applique/fashion/music-song-to-sail-you-through-the-weekend/
Video Post
A video post displays a video at the top of your post. You can share videos from nearly all video hosting sites, such as Vimeo or YouTube. Just simply copy & paste the video’s URL, embed code into the special input box.
Example of a video post: http://dahz.daffyhazan.com/applique/fashion/video-today-i-am/
Once you’ve determined your desired post format, entered your title, and added your content, remember to assign at least 1 category to your post. Additionally, also ensure you assign a featured image to the post.
After you’re finished preparing your post, you can click “Preview” to preview how your post will look once published onto your site. Click “Publish” to have it appear on your site, or click “Save Draft” to save your post as it is, though not publish it yet.
To learn about how to add the Continue Reading button seen on the demo site to your posts, check out this article: How do I add the “Continue Reading” button to posts in Applique?
Assign a Featured Image
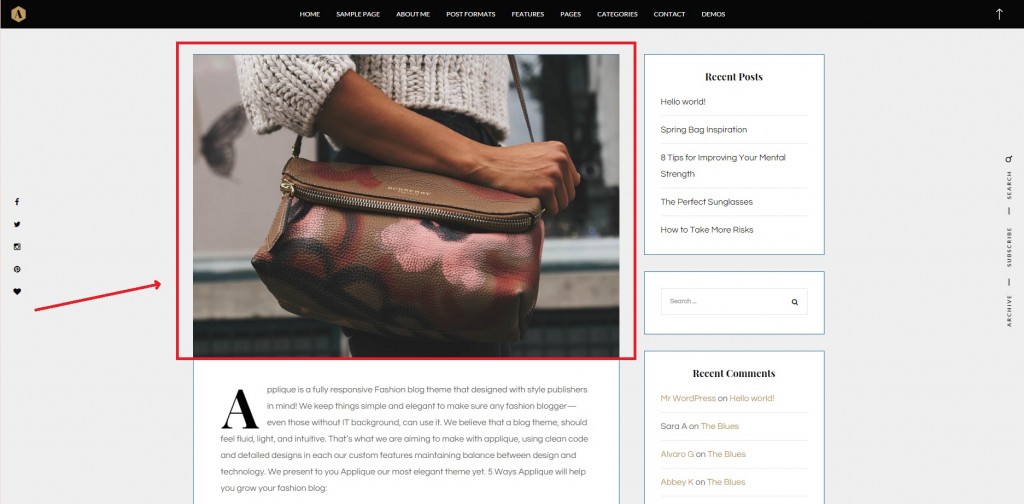
To set a featured image to your posts is very important, as the featured image is what the theme and other web functions use to visually represent the post in various situations.
What is a Featured Image?
The Featured Image is a WordPress theme feature which support for using a representative image for posts, pages, related post areas, recent post widgets, featured area sliders, etc.
How do I assign a Featured Image?
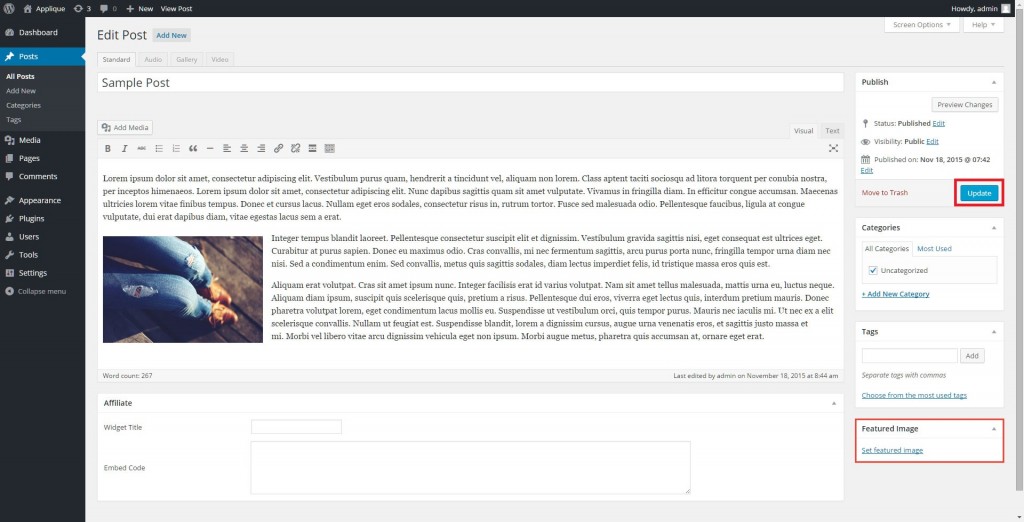
To assign a Featured Image to a post, navigate to your post’s create or edit screen and look to the bottom-right. Here you’ll see a box titled “Featured Image” where you can add your desired image. Be sure to click “Update” button when you’re finished.
Important! Please ensure that the source images are at least 1200px in width & 675px in height.
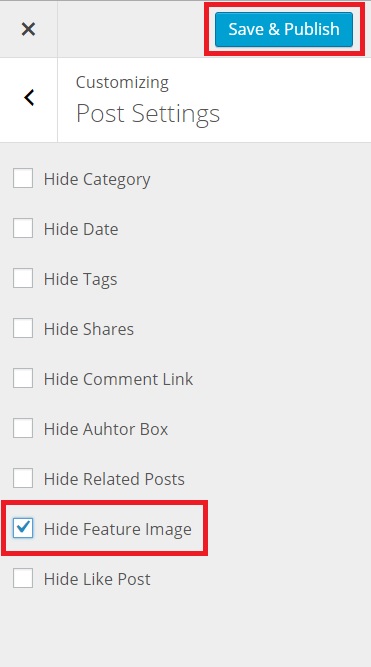
Note: If you don’t want to display the featured image, you don’t have to assign the featured image, or you can also simply hide it by navigating to WordPress Dashboard > Appearance > Customize > Post Settings > and checking the box to “Hide Featured Image”.
Upload Your Category & Tag Image Post
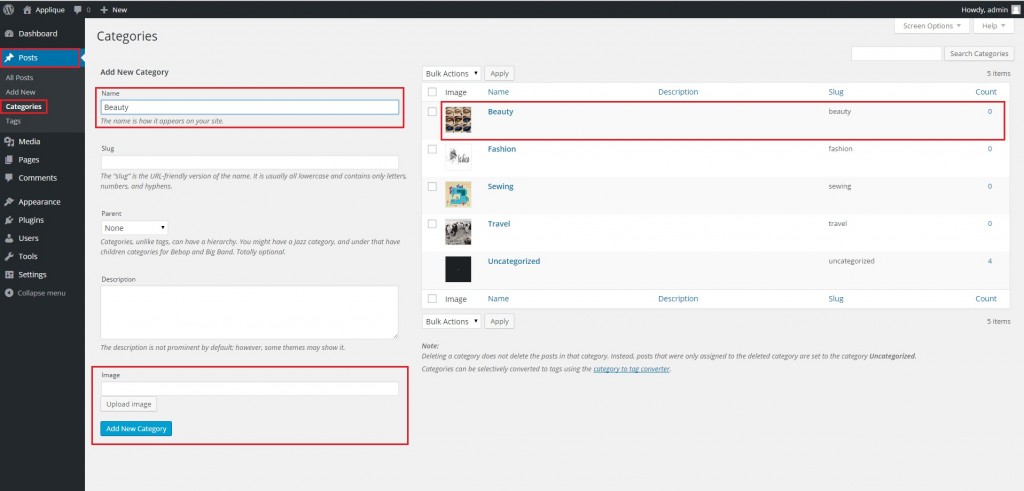
You can insert a photo in Category and Tag that will appear in the top of your post. First, in order to get category image navigate to WordPress Dashboard > Posts > Categories. On the left of the screen, there is option titled Add New Category, then write your name category. After, find the option titled “Image”, upload your image and be sure hit the “Add New Category” button.
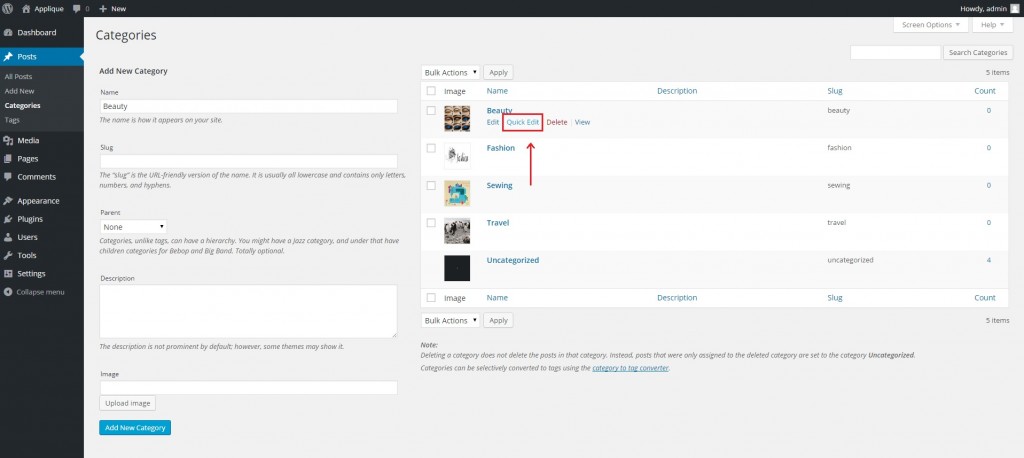
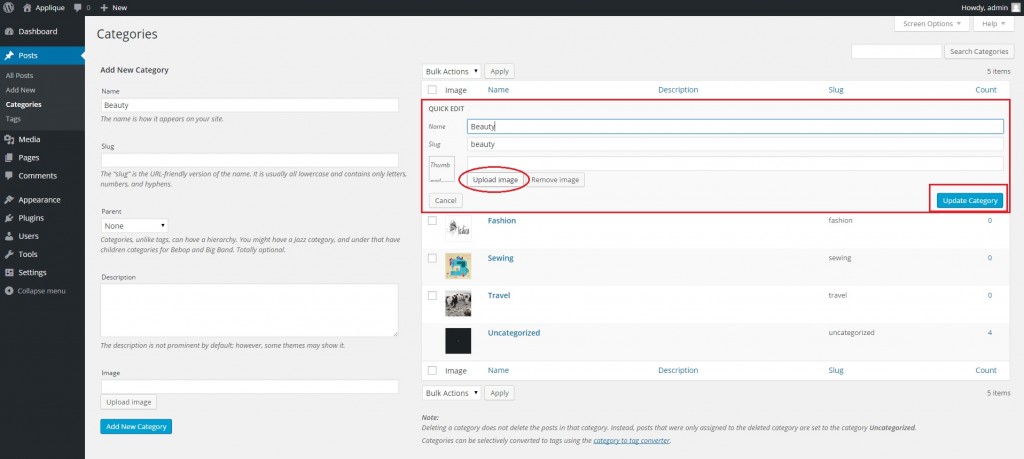
Additionally, if you’d like to change your image category, see on the right of the screen there are a list of your categories that already created. Choose which category that you want to change the image. Then, hover your mouse into category list that you desired and simply clicking “Quick Edit” and upload your image.
Now, to upload image in your Tag just simply like upload image to Category.
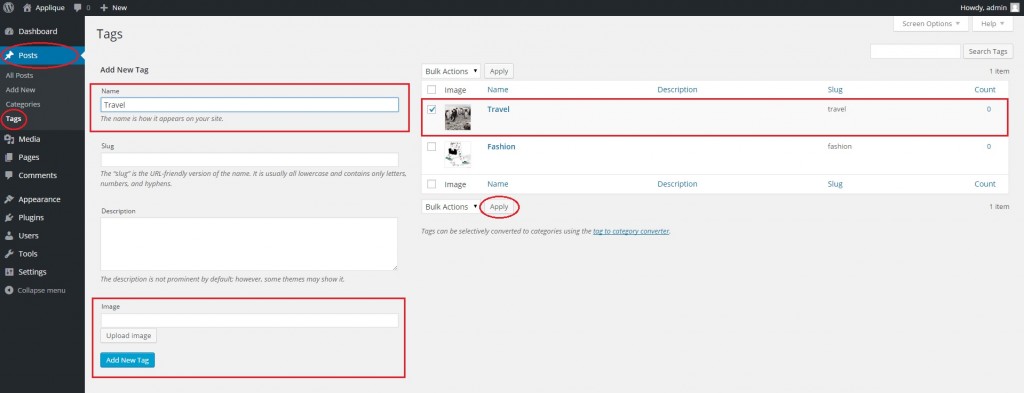
Navigate to WordPress Dashboard > Posts > Tags
To add a new image in Tag, write your name category first in the box below option titled “Add New Tag”. Then find the option titled “Image”, upload your image and be sure hit the “Add New Tag” button.
After that, you’ll see the tag list that you’ve created. Check the tag box(es) that you desired, then click “Apply” button.
Additionally, if you’d like to change your image tag, see on the right of the screen there are a list of your tags that already created. Choose which tag that you want to change the image. Then, hover your mouse into tag list that you desired and simply clicking “Quick Edit” and upload your image.
Creating a Page
A standard page is similar to creating a post in many ways, and ideal for creating an About Me or Contact Me section to your website.
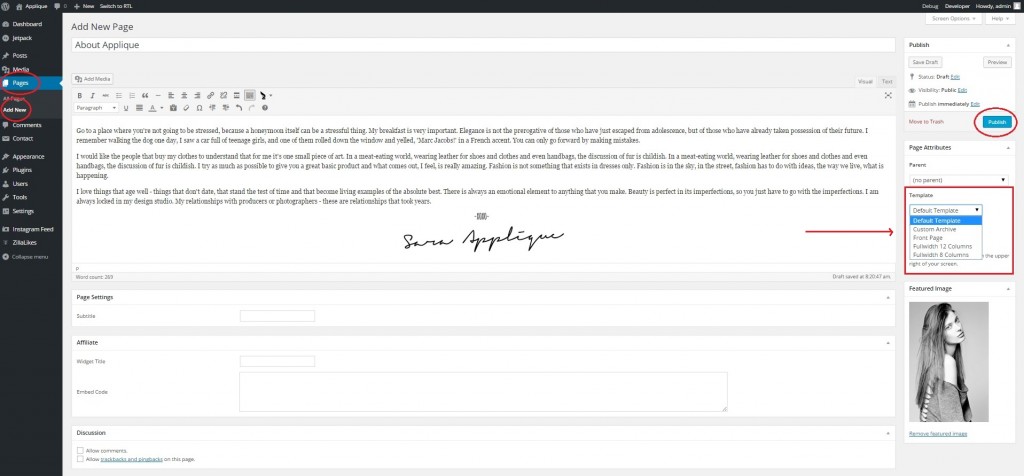
To create a new page, navigate to WordPress Dashboard > Pages > Add New
Like a post, you can enter a page title, add content, and assign a featured image.
Additionally, you have the option of choosing between a numbers of page templates/layouts via the drop-down menu on the bottom-right of this screen titled “Template“:
- Default template (Sidebar Page layout)
- Frontpage
- Archive
- Fullwidth 12 columns
- Fullwidth 8 Columns
Once you’ve published your new page, it will not automatically appear in your main menu. For a tutorial on adding items to your main menu, check this out: How to add page to my navigation menu?
Creating a Front Page Template
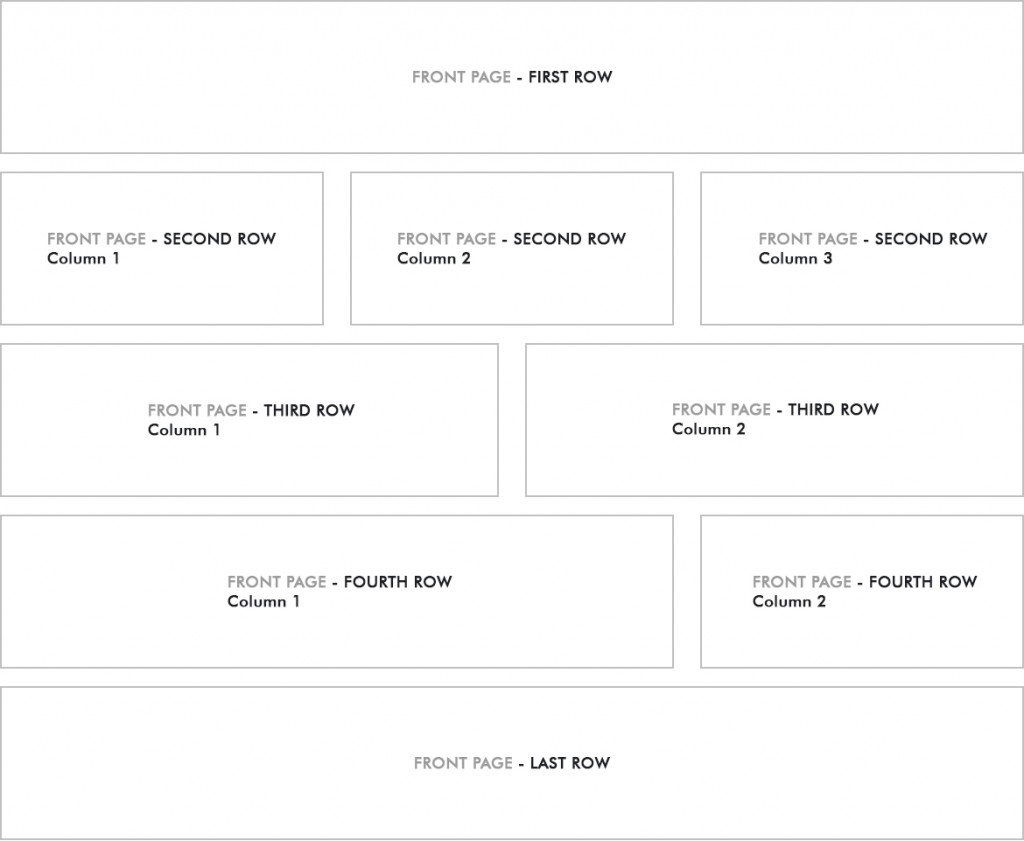
Applique offers the custom Front Page with the different widget areas. You can include all of the Applique widgets in your Front Page widget areas. The widgets will have a slightly differently layout and number of columns in each widget area, depending on the width of the widget area.
Here is an overview of all Front Page widget area:
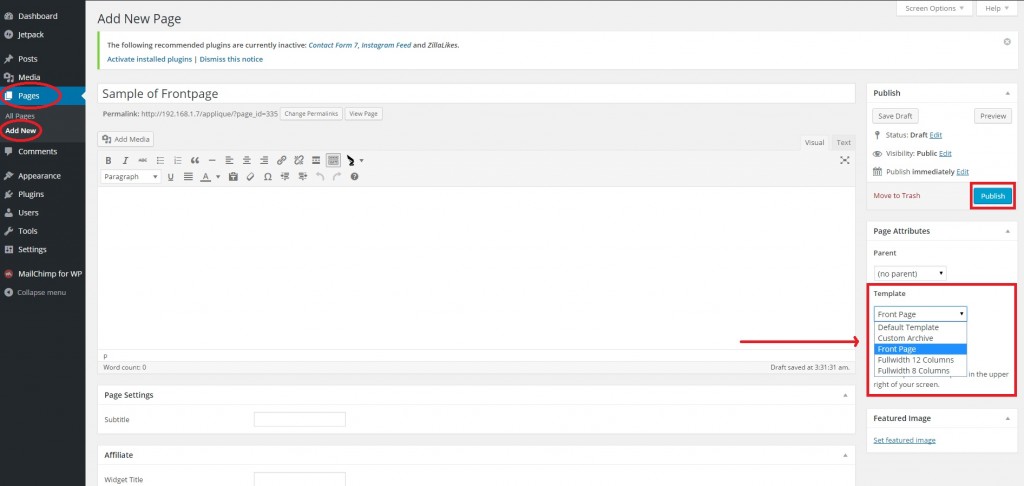
You have to create your page first, navigate to WordPress Dashboard > Pages > Add New > write your title > Page Attributes, choose the ‘Front Page’ template (see screenshot below) > click ‘Publish’ button.
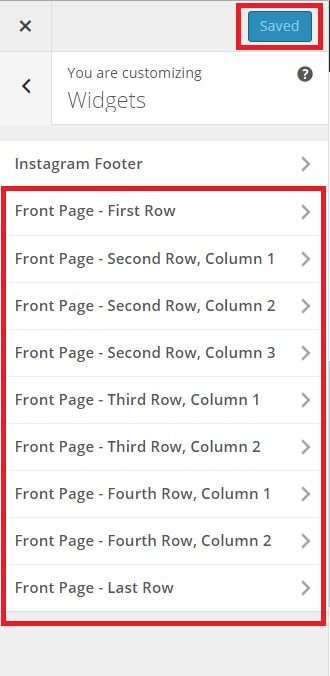
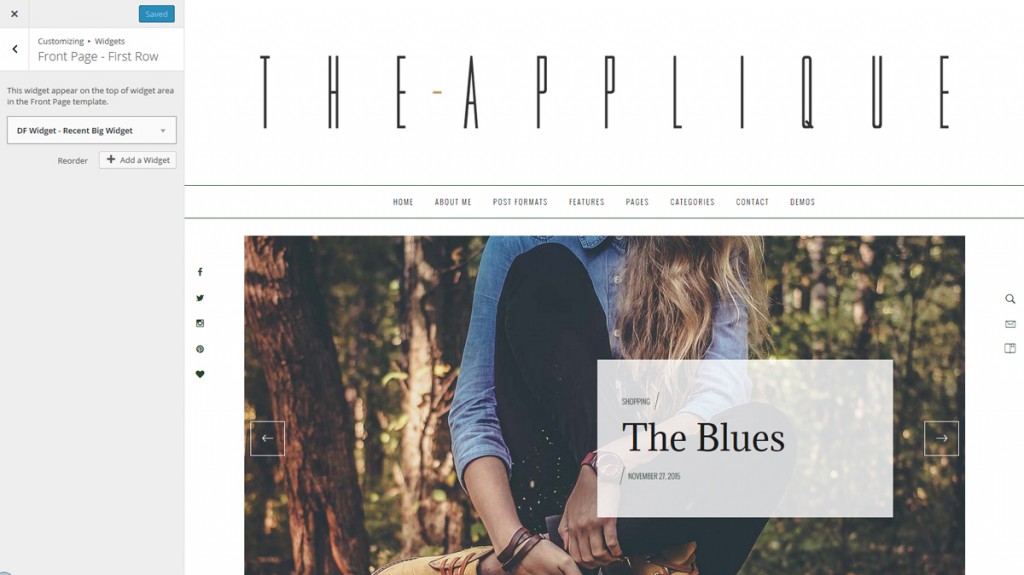
After, you will to click ‘View Page’ at the top of this screen, then click ‘Customize’ you will direct to Customizer. Here, click Widgets > choose all lists that titled ‘Front page’ > insert you’re the desired widgets. On the right of your screen you can see the live preview of how your widget will appear. Be sure hit the ‘Saved’ button when finished.
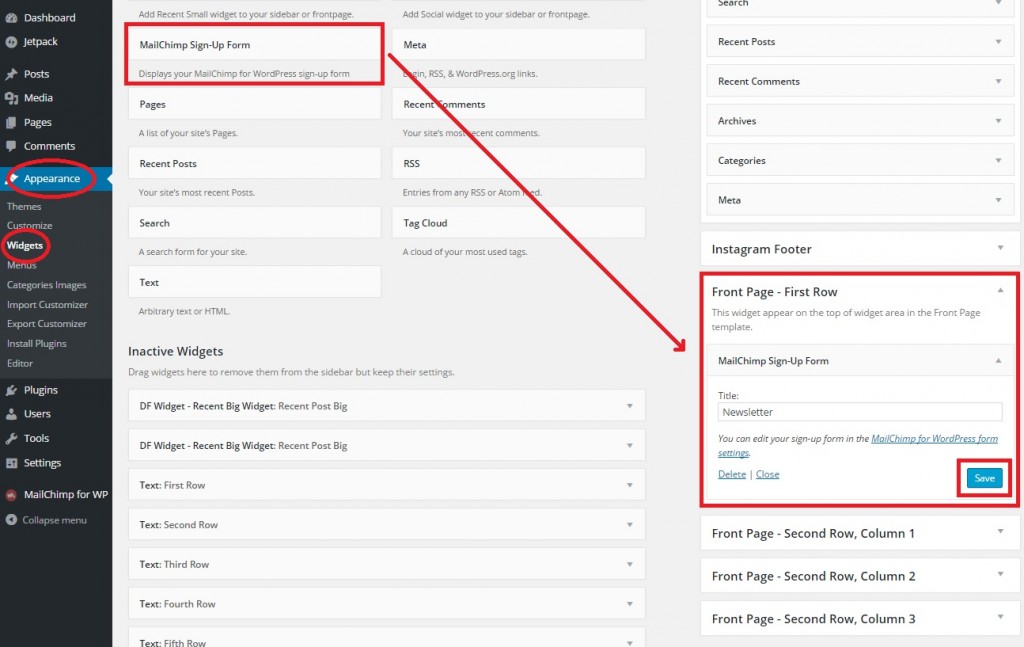
Or you can set your widgets into your Front Page in another way. Just simply navigate to WordPress Dashboard > Appearance > Widgets > drag you’re the desired widgets and drop into the Front Page lists (see screenshot below).
If you want to make your Front Page template to be your Home Page, just simply check this article How to Create a Static Home Page & Separate Blog Page.
Adjusting the Layout of Your Category Pages
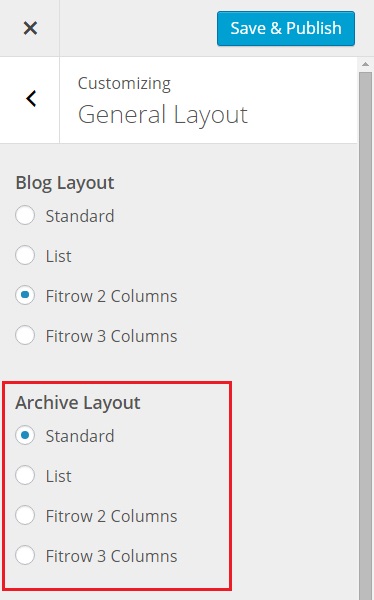
Category Pages which display all posts related to a particular category, Tag Pages which display all posts related to a particular tag, Author Pages which display all posts related to a particular author, etc., are called “Archive Pages“. To change the page layout of your archive pages, head to Appearance > Customize > General Settings > and choose from the layout options within the “Archive Layout” section.
Homepage Settings
Homepage is the first page visitors will see when they arrive at your website. By default, the homepage will be the page that also displays all of your posts, beginning with the most recent.
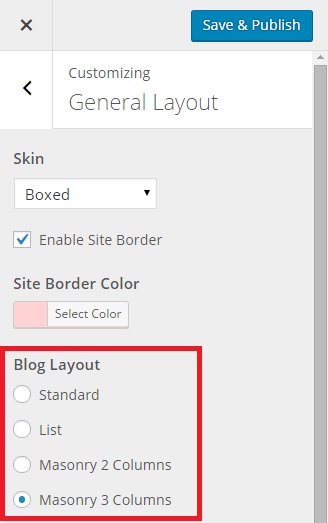
To customize how your homepage looks navigate to WordPress Dashboard > Appearance > Customize > General Layout.
Set your skin
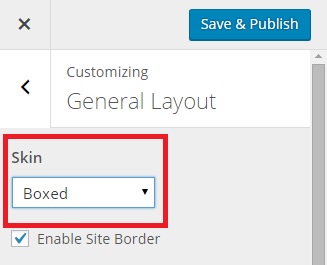
There are 3 types of skin that you can apply in Applique, Light, Bold, and Boxed.
To set these skin, in the same screen click ‘Skin’ drop-down option and choose your desired skin.
Set a frame to your site
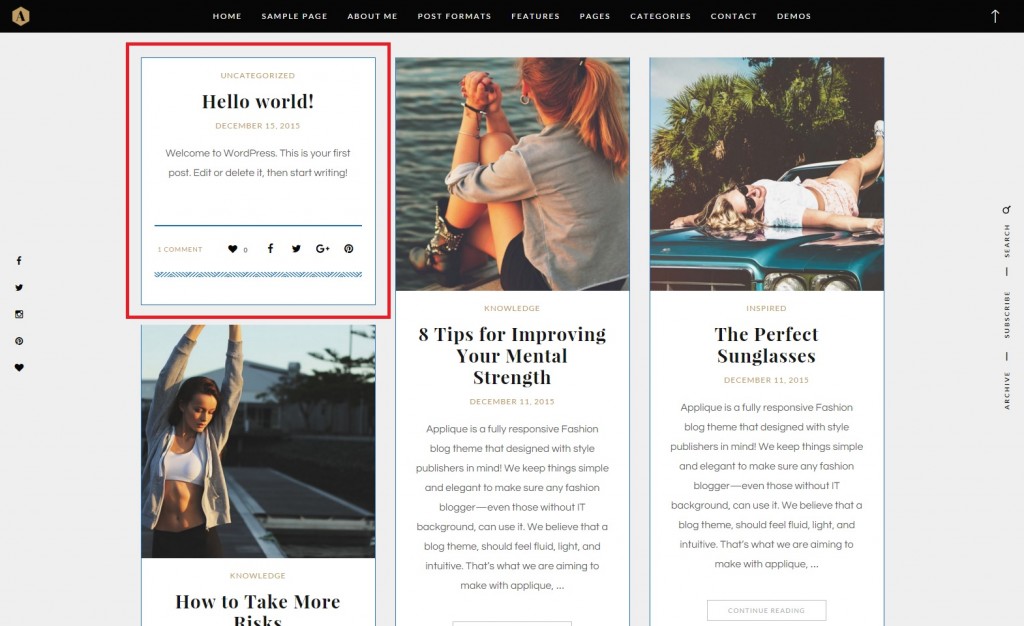
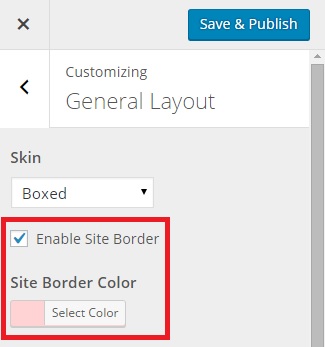
As you can see the screenshot above, check the box next to ‘Enable Site Border’, and then you can choose your desired color.
Set your blog layout
Simply click the bubble next to layout option.
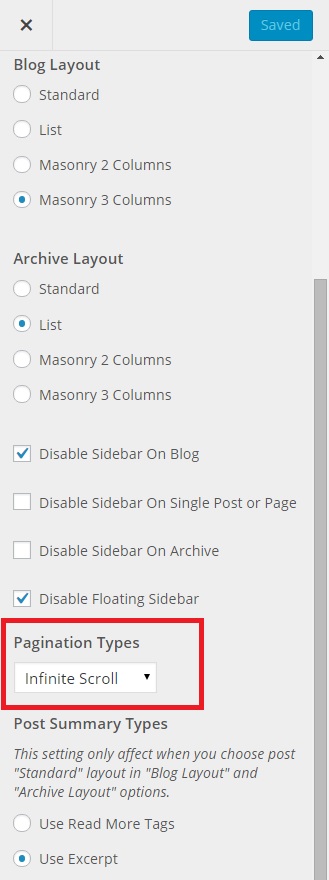
Set your pagination type
Still on this screen, scroll down and choose ‘Pagination Types’ option (see screenshot below), there are 3 types: Old and New, Number, and Infinite Scroll, you can choose your desired type.
Be sure to explore the various list options in this Customizer section; you’ll find loads of ways to customize your homepage & website in general. The live preview on the right will show you a preview of how each adjustment will visually affect your site. Just try and have fun! 🙂
If you’d like your home page to instead be a static page and have your post feed display on another page entirely, please check out this article: How to create a static homepage & separate blog page.
Adding Social Icons & Misc
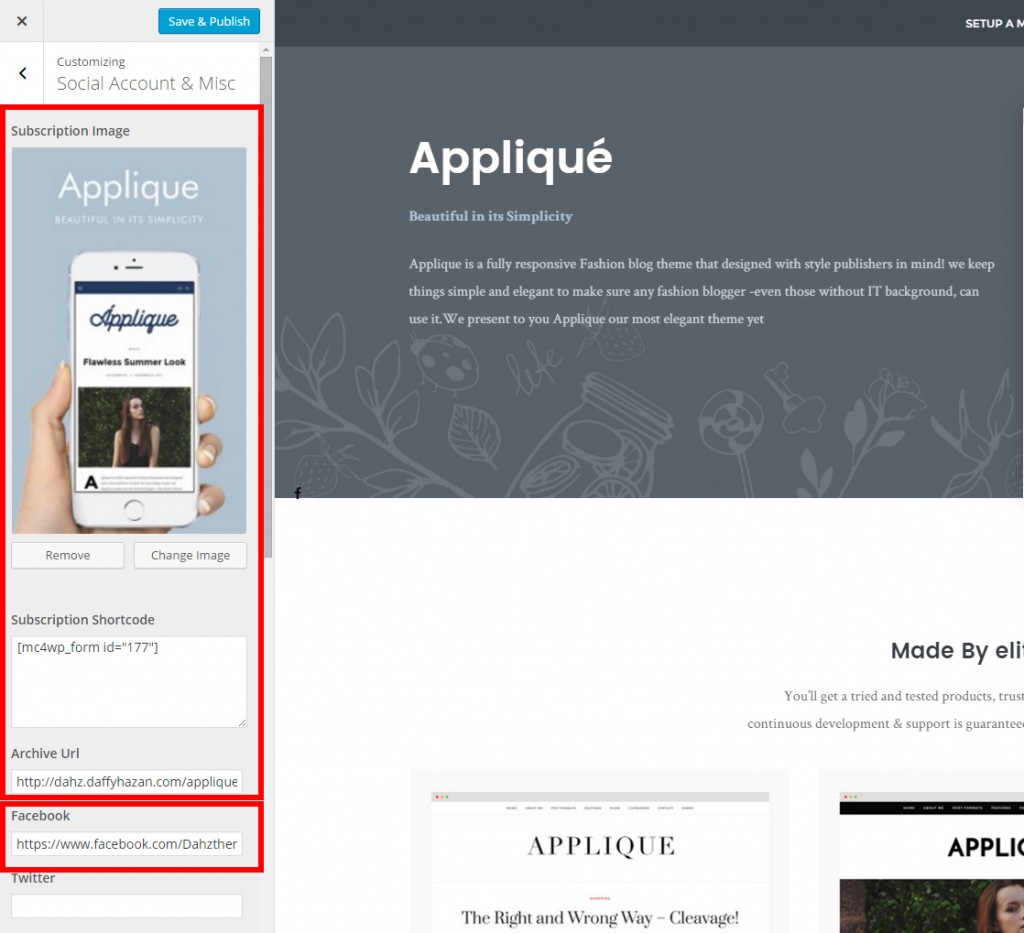
Navigate to Appearance > Customize > Social Account & Misc.
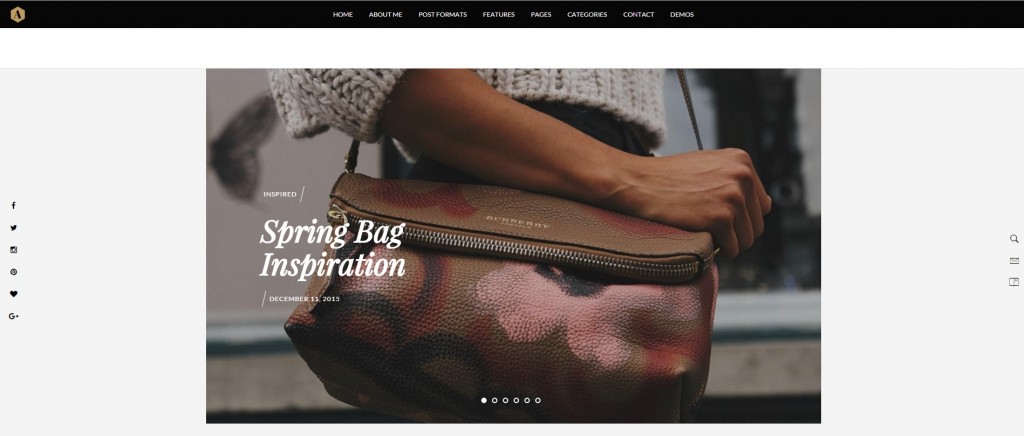
In this part, you will see a list of social networks followed by a text input box. If you’d like to have a social icon for particular social network, just simply copy and paste your account’s URL into a particular social network’s text box (see screenshot below). Once you enter your account’s URL, its icon will appear in your floating social icon (left-side) & social widget icon area. Be sure to click “Saved” button.
Enabling the Featured Area
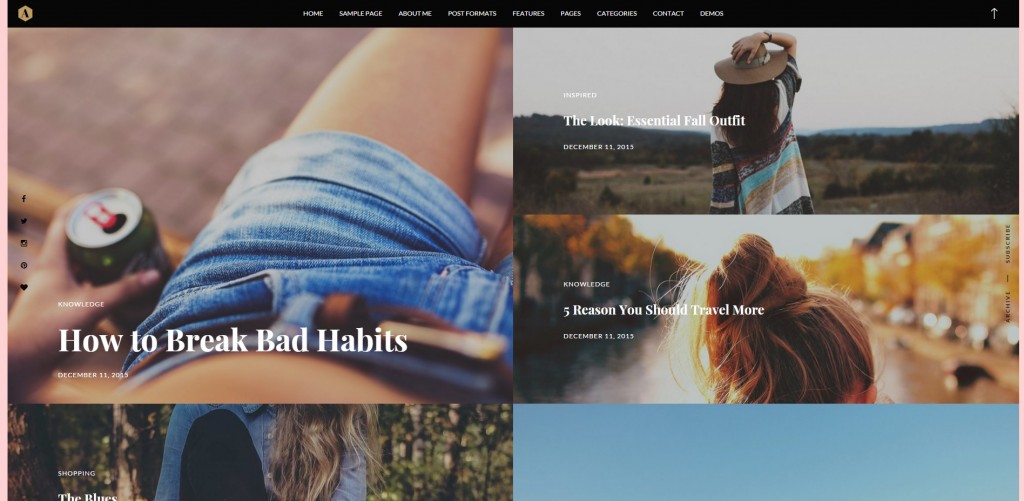
First thing that you have to know is Applique’s featured area only set by default at 1170 x 658 pixels, and there are 2 types appearance: Slider and Grid.
Featured Area Slider
Featured Area Grid
Setting Up the Featured Area:
There are a few steps to ensure your slider works perfectly:
- First, make sure your posts have featured images assigned. This is the image that the slider will pull in represent your post.
- To have your slide images display in the best quality, please ensure that the source images are at least 1200px in width & 675px in height. If your featured images are smaller than 1200px in width & 675px in height, WordPress will upscale them to fit the slider’s container size which may result in image.
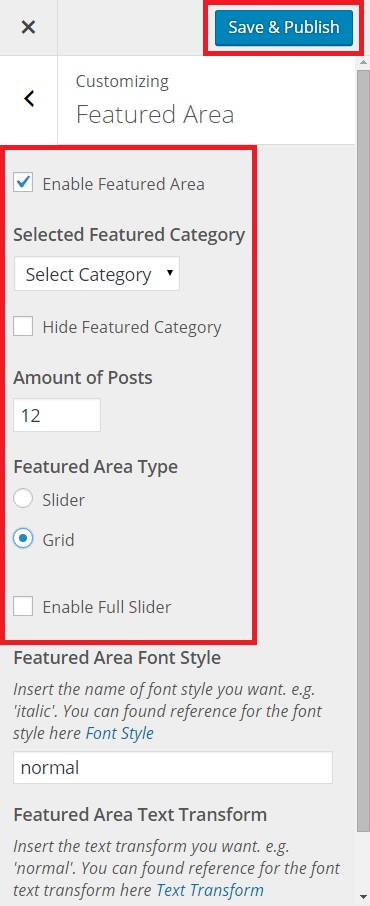
- Lastly, navigate to Appearance > Customize > Featured Area > and check the box next to “Enable Featured Area”. Additionally, you can select the specific your featured area by:
- All latest posts: By default, the featured area will display all of your latest posts.
- Posts from specific category: From the drop-down menu titled ‘Select Featured Category’, you can specify the exact posts and/or pages to display in the slider.
- Amount of Posts, you can determine the amount of your posts to display.
- Featured area type, choose your type that you like the most.
Be sure to click ‘Save & Publish’ button when finished.
NOTE: Use landscape photos for the best result.
Setting Up Your Sidebar
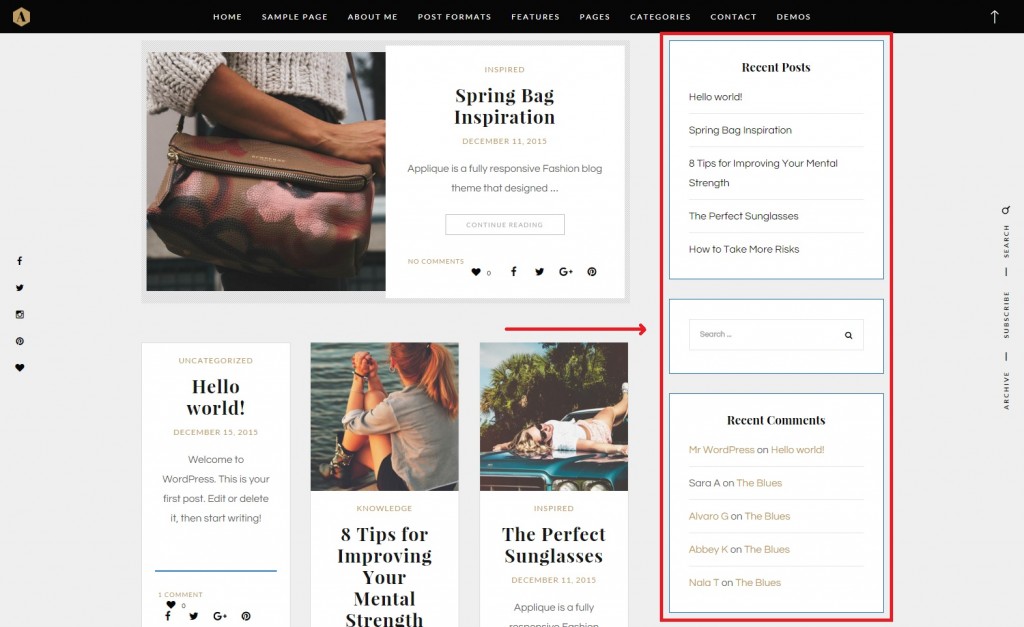
A sidebar is a vertical content area that displays to the right of your main content or post area. Customize your sidebar by stacking up different widgets that display a variety of things.
Enabling/Disabling the Sidebar:
To enable or disable the sidebar on your homepage, your posts, and/or your archive pages (category pages, tag pages, etc.) navigate to Appearance > Customize > General Layout.
Here, you can check or uncheck the boxes next to “Disable Sidebar on Blog”, “Disable Sidebar on Single Posts or Page”, “Disable Sidebar on Archive”, and “Disable Floating Sidebar”. Be sure to click ‘Save & Publish’ button if you’re finished.
Adding Widget to Your Sidebar:
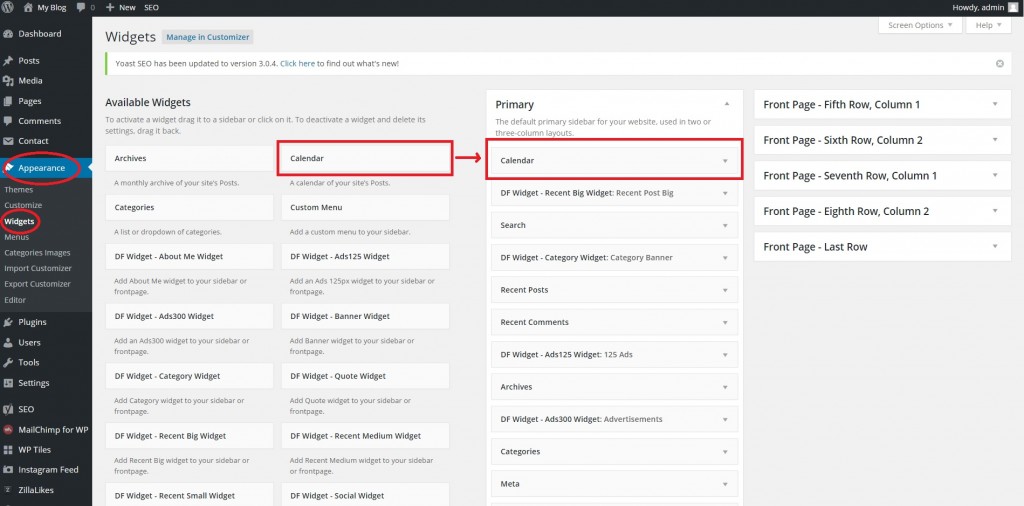
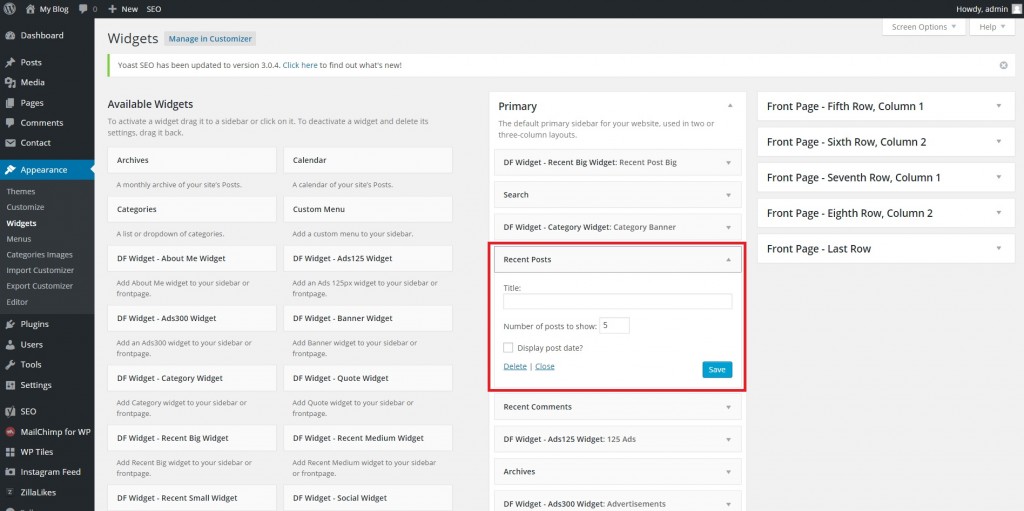
In your sidebar, you can add, remove, or edit sidebar widget, go to Appearance > Widgets.
On the left, you will see a list of the available widgets to choose from.
On the right, you will see a few different widget areas in the theme.
To add a widget to your sidebar, simply drag and drop a widget on the left into the widget area titled “Primary”.
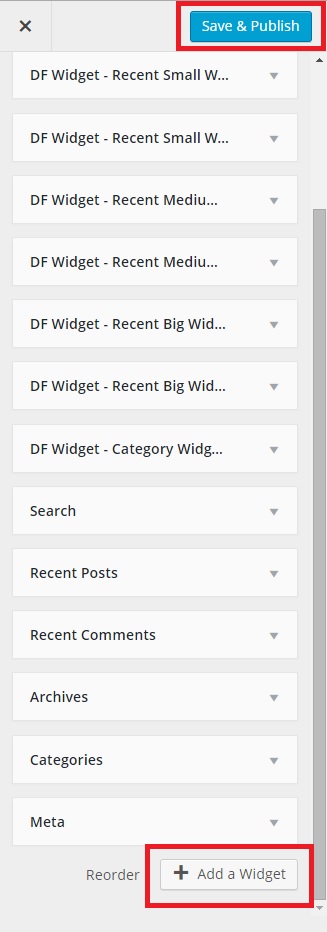
Or you can add widget within WordPress Dashboard > Appearance > Customize > Widgets > Primary > click ‘Add Widget’, and then choose your desired widget.
Edit Widget in Your Sidebar:
After you’ve dropped a widget into the Sidebar widget area, click on its heading. A drop-down will appear and you can make any necessary adjustments to the widget’s settings and you can also delete the widget. To position widgets within the sidebar, just simply drag & drop them above or below each other.
Setting Up the Widget under Featured Area
Adding Widget to Your Blog Page:
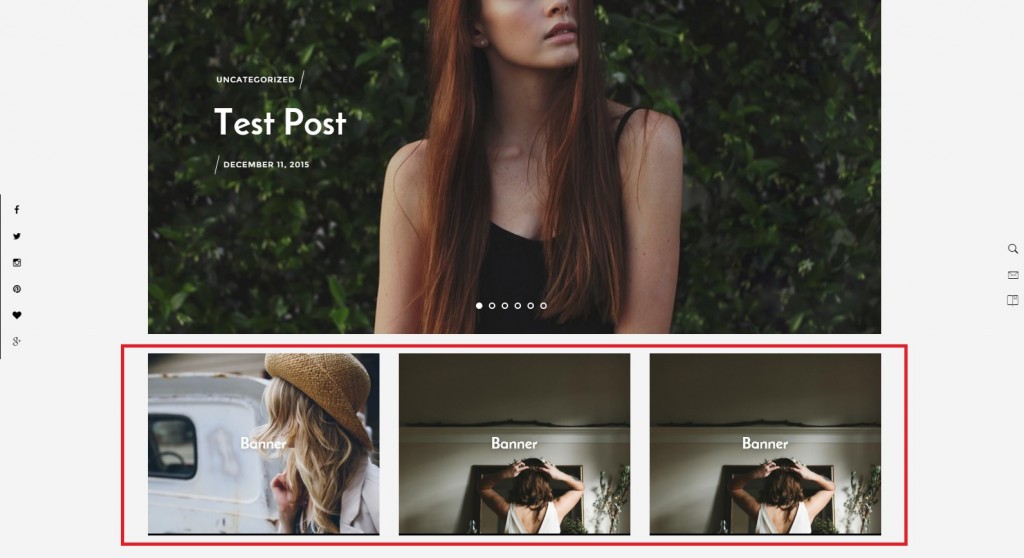
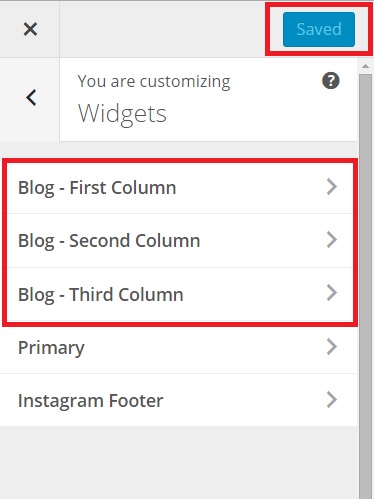
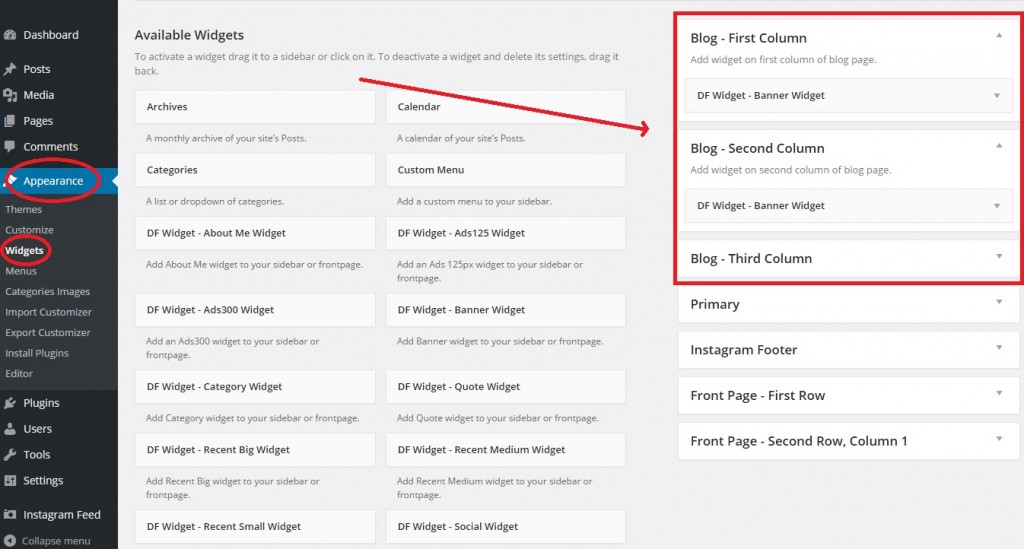
Applique has 3 columns widget area, and these will only appear in your Blog page, and the position is below the Featured Slider area.
Go to Appearance > Customize > Widgets. Here, you will see the option list widget to choose from, choose the desired column then add your widget.
On the right, you can see the live preview how your widget will appear before publish.
Don’t forget to click ‘Save & Publish’ button when finished.
Or, you can add the widget within WordPress Dashboard > Appearance > Widgets > choose the Blog Column that you desired (see the screenshot below), and then add the widgets.
Setting Up the Footer Area
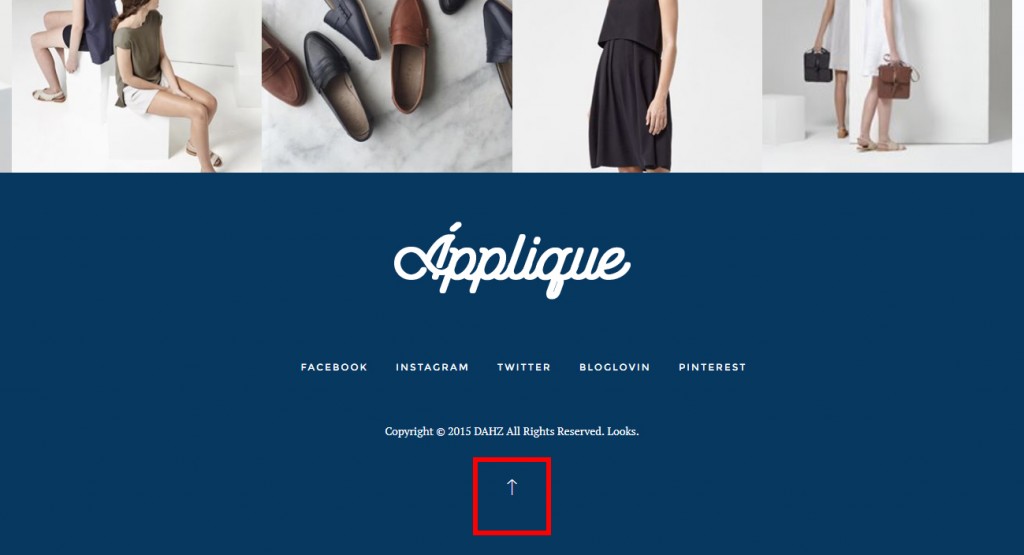
The footer area is the lower portion of theme that will appear on all pages of your site. Applique has five different contents, these include:
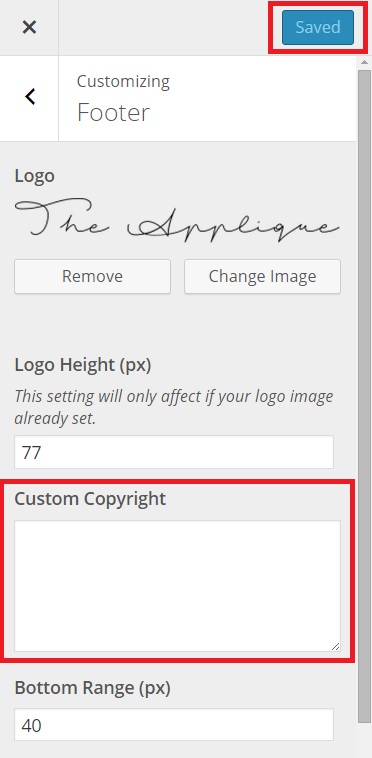
- Copyright text area
There’s a bar of the very bottom theme which features a text area to include copyright or disclaimer text. You can type whatever you’d like in this area. To edit the text in this Copyright Text Area, navigate to Appearance > Customize > Footer.
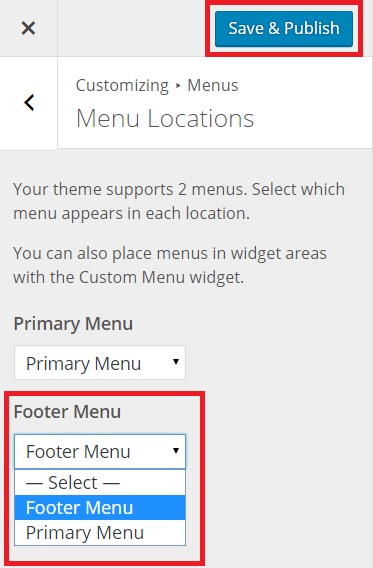
- Menu footer area
You can create your menu in footer by navigate to WordPress Dashboard > Appearance > Menus > Menu Locations > Footer Menu > click the drop-down menu to choose the desired menu. Be sure to click ‘Save & Publish’ button.
- Logo footer area
You can insert your logo in footer just simply go to WordPress Dashboard > Appearance > Customize > Footer > upload your logo by clicking ‘Select Image’.
- Back to top button footer area
- Instagram footer Area
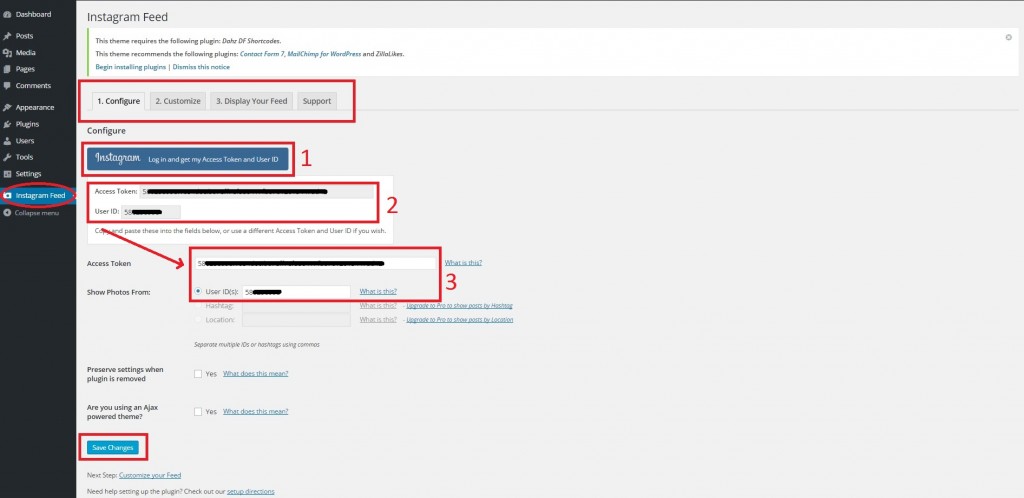
Applique’s footer has a widget area titled “Instagram Footer” where you can add in a widget to display your Instagram images in a full-width. The widget is simply called “Instagram” and is made available after installing & activating the plugin called Instagram Feed.
After you installed & activated this plugin, it will automatically appear at your Dashboard titled ‘Instagram Feed’. In this screen you’ll see the configuration, customize, and display your feed. But, the most important is to configure your Instagram first by logging in your Instagram user ID. After, you will get Access Token ID (see the screenshot below), then copy & paste the ‘Access Token’ & ‘User ID’ to the box below it. Be sure, before you go to Customize click the ‘Save’ button first.
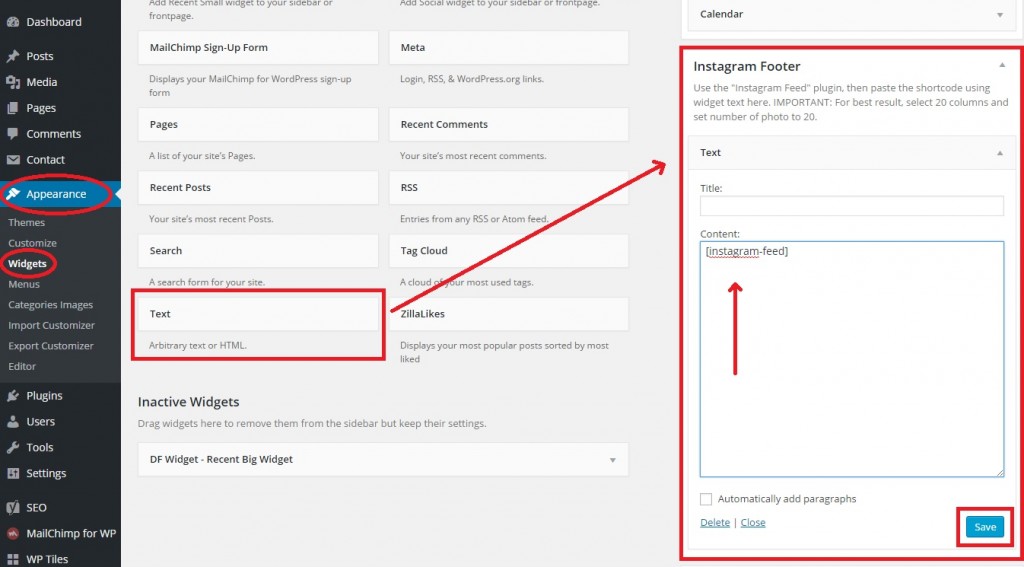
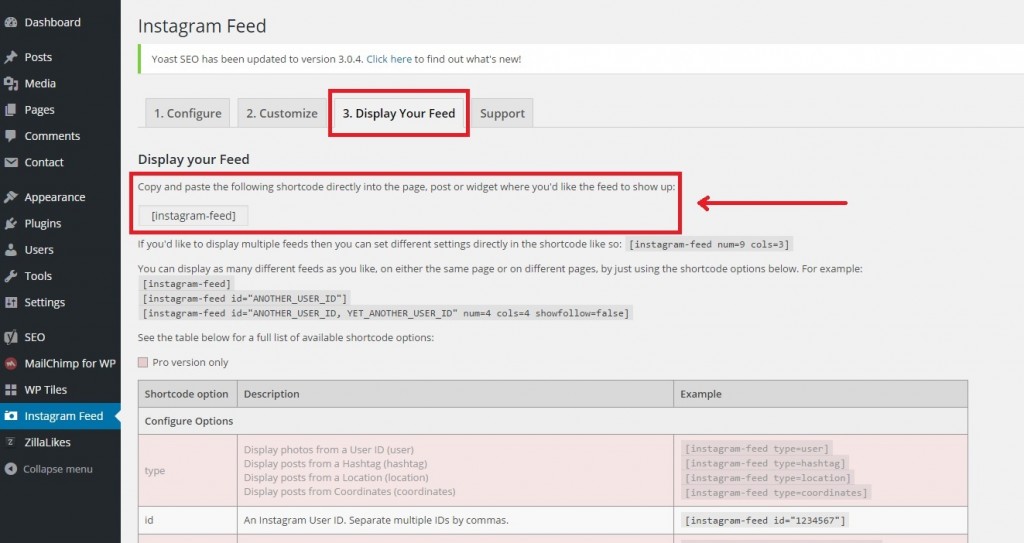
Now to get your Instagram Feed appear on your footer, go to Appearance > Widgets > drag the ‘Text’ widget and drop it in ‘Instagram Footer’ (see the screenshot below). Then, copy the following shortcode and paste into the ‘Content’ box.
Additionally, you can put a text title above & the content below of your Instagram feed photos. To get this options navigate to WordPress Dashboard > Customize > Widgets > Instagram Footer > write your title & content in the boxes named “Title” and “Content”. In this Customizer, you can see the live preview how your title and content will appear before you published. You can also paragraphs your content by check the box titled “Automatically add paragraphs”. Be sure to click ‘Save & Publish’ button.
For any issue that related to this article please go to our support forum. Our team support will happy to help 🙂

